Thursday, August 26, 2010

custom wedding announcements


Get 500 5x7 announcements for $195!
Contact for custom package deals. Here is some of my most recent work. You can view my official website at http://announce.fami.ly. I would love to design your wedding announcements for you!

selling my wedding dress


here it is


I am selling it as is. It is wrinkled around the train and got a little dirty along the bottom from walking around all day and taking pictures. Simply needs to be steamed and pressed and it will look like new :) Come try it on!

Sunday, December 6, 2009

fine art templates

1. weed: 10/17/09; 2:00 pm; Swan Valley; f 2.7; 1/2000; Sony Cyber-shot DSC H7 (checked out from library)
2. texture: 10/17/09; 2:05 pm; Swan Valley; f 3.5; 1/80; Sony Cyber-shot DSC H7 (checked out from library)
3. tree: 10/27/09; 12:15 pm; Rexburg; f 3.2; 1/500; Canon PowerShot A520


The template used for both of these images was created in Photoshop simply using the rectangle tool (to make the boxes) and a clipping mask. It is quite simple to do and gives a really nice effect. The picture used in the first template was a combination of two images overlayed with a blending mask in Photoshop. I made the picture in the second image black and white and added a sepia photo filter. Levels were slightly adjusted in both pictures before I put them in the template.


Sunday, November 15, 2009

"photolusion" edited

all images taken with Canon PowerShot A520

1.brittani: 11/13/09; 4:25 pm; Rexburg; f 2.8; 1/40
2.fridge: 11/13/09; 4:30 pm; Rexburg; f 2.8; 1/30
3.edited photolusion

The idea for this image came a little faster than my idea for my unedited shot. I was just taking a food break and looking in the fridge while I was trying to figure out what to do and noticed a space between the milk and the ketchup. Then I just had the thought that I could cut someone out of another picture and make it look like they were in the fridge. I took a picture of my roommate, cut her out using the quick selection tool, and placed her in the fridge image where I slightly adjusted the levels.

"photolusion" unedited

image taken with Canon PowerShot A520

1.mirror image: 11/13/09; 3:30 pm; Rexburg; f 3.2; 1/20

I had a really hard time trying to think of what to do for this picture. I looked at images on google for a long time just trying to get some ideas. I brought a mirror out to my living room to play around with and when I stepped back and was looking at it trying to figure out what to do, I could only see up to my neck and suddenly had the idea to pose someone in the mirror so you could see their body, and then have someone behind the mirror whose head would match up to the image of their body in the mirror. This was the result. I adjusted the levels in this image, applied a black and white adjustment layer, used a layer mask to mask out the mirror part of the picture and added a sepia photo filter.

Sunday, November 8, 2009

panoramic image

I took all of my pictures and turned all of them into panoramics in Photoshop. I even tried all of the different blending modes on a couple of them to see which ones turned out the best. It was interesting how the effectiveness of the blending mode totally varied depending on the series of pictures. I liked how this panoramic turned out the best. I adjusted the levels and saturation a little and also added a sepia filter.

originals (for panoramic)

all images taken with Canon PowerShot A520

1.first: 11/6/09; 4:15 pm; Rexburg; f 7.1; 1/500
2.second: 11/6/09; 4:15 pm; Rexburg; f 8.0; 1/500
3.third: 11/6/09; 4:15 pm; Rexburg; f 8.0; 1/500
4.fourth: 11/6/09; 4:15 pm; Rexburg; f 8.0; 1/500
5.fifth: 11/6/09; 4:15 pm; Rexburg; f 8.0; 1/500


This week we were to take three or more overlapping images of one scene. I thought it would be fun to try and get some shots out by the railroad tracks past Broulim's. It was a beautiful day on Friday when we went and the sky was perfect. I tried taking quite a few series of shots of different scenes around the same area. It was fun for me to try and focus more close up on one thing in the first image and then pan out from there.


Sunday, November 1, 2009

photobook spread

1.original template
2.my alterations
3.final spread

For my photobook spread, I took one of Sister Esplin's templates and changed it a little bit. I changed the fonts and moved the frames around. I liked the background so I kept it how it was and then I added a black layer over it and made it ever-so-slightly opaque so that you can still barely see the lines of the original background underneath it. Then I just threw my pictures in and readjusted the frame placement of each of the pictures.


a photo a day

all images taken with Canon PowerShot A520

1.angel: 10/26/09; 12:30 am; Rexburg; f 3.2; 0.3
2.tree: 10/27/09; 12:15 pm; Rexburg; f 3.2; 1/500
3.apple: 10/28/09; 4:15 pm; Rexburg; f 3.5; 1/1000
4.sky: 10/29/09; 3:45 pm; driving from Rexburg to I.F.; f 7.1; 1/800
5.railroad tracks: 10/30/09; 5:40 pm; Idaho Falls; f 2.6; 1/160
6.lamppost: 10/31/09; 1:40 pm; Rexburg; 3.5; 1/1000
7.michael and mom: 11/1/09; 5:50 pm; Rexburg; 2.6; 1/60

This assignment was really cool and kind of frustrating at the same time—frustrating in the sense that instead of taking the majority of my pictures over the weekend, which I typically do, I had to remember to make a little time every single day to take some shots. Then it was hard to narrow it down and select my final seven because it always seemed that on a day I had a shot I really liked, I would have at least three or four other shots that I really liked. And instead of being able to replace those with pictures from other days that didn't turn out so great, I just had to choose the best one from every day. Overall, I found it to be a fun challenge and I actually really did like having to take pictures every day because it forced me to pull out my camera more than I normally would.


Sunday, October 25, 2009

portrait enhancements

all images taken with Canon PowerShot A520

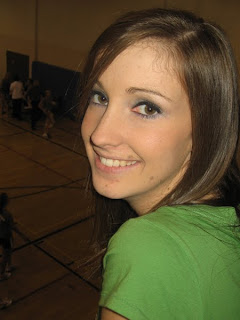
1.carolee unedited: 10/24/09; 2:10 pm; Rexburg; f 3.2; 1/60
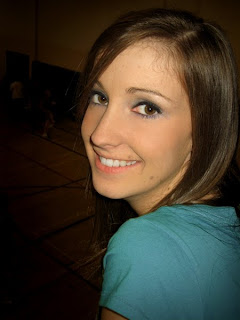
2.carolee edited: used healing brush, clone stamp, and sponge tool + to enhance portrait (removed what little acne there was, whitened teeth and whites of eyes, increased saturation in eye and lip color, removed a strand of hair that was across face, removed darkness under the eyes, changed color of shirt, etc)
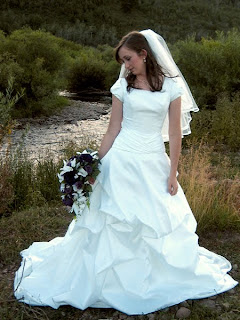
3.emily unedited: 8/12/09; 7:40 pm; Star Valley; f 3.2; 1/320
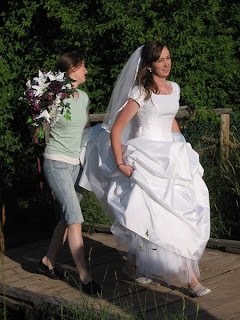
4.match color: 8/12/09; 7:30 pm; Star Valley; f 5.6; 1/1000
5.emily edited: used match color option to pull the color tones from the second picture and apply them to the first one; slightly adjusted levels and saturation

I was very appreciative of this editing assignment for the practice. The portrait enhancement tutorial was especially helpful and worthwhile, and I felt like I was able to learn a lot about the benefit of just little changes that don't detract in any way from the personality of the person but simply 'enhance' the portrait. The match color option is absolutely incredible. I didn't realize just how bad the coloring in my original image was until I saw it contrasted with the edited one—so incredible. I couldn't believe the difference and how easy it is to make the edit.